Why use Vue.JS with WordPress plugins and widgets
Working with VueJS is extremely easy, we can quickly write simple and structured code without too much size overhead(only 30kb size). Very easy to read, maintain and their documentation is KING! What easier way to show the advantages of using VueJS than building some real life example.
Now lets build and example WordPress widget using Vue.JS
The widget I’ll be building today is a Newsletter subscription widget which will use AJAX to subscribe the user to your MailChimp list.
- Create the widget HTML markup
- Load the needed JS and CSS files
- A word on nonces in AJAX
- Create the widget itself and do the VueJS markup
- Register the AJAX action that will process the request
Create the widget HTML markup
I think this is the easiest part in the whole article, although I haven’t tested the markup in different themes, and I’m not sure how it will perform. The HTML is as simple as a form with a name and an email field.
<form class="news-letter" action="#">
    <h1 class="news-letter-title">Newsletter Signup</h1>
    <input type="text" class="news-letter-input" name="" placeholder="What's your name?" autofocus>
    <input type="text" class="news-letter-input" name="" placeholder="What's your Email?" autofocus>
    <button class="news-letter-button">Subscribe Now</button>
</form>
The CSS is also not so sophisticated:
.news-letter {
  border-radius: 5px;
  -webkit-box-shadow: 0 1px 5px rgba(0, 0, 0, 0.25);
  box-shadow: 0 1px 5px rgba(0, 0, 0, 0.25);
  position: relative;
  margin: 20px auto;
  width: 250px;
  padding: 33px 25px 29px;
  background: white;
  border-bottom: 1px solid #c4c4c4;

}

.news-letter:before, .news-letter:after {
  height: 10px;
  background: inherit;
  border-bottom: 1px solid #d2d2d2;
  border-radius: 4px;
  content: '';
  position: absolute;
  bottom: 1px;
  left: 0;
  right: 0;

}

.news-letter:after {
  bottom: 3px;
  border-color: #dcdcdc;
}

.news-letter-title {
    background: none repeat scroll 0 0 #FFFFFF; /* newsletter background  */
    color: #AAAAAA;
    font-size: 20px;
    font-weight: 300;
    line-height: 0;
    margin: 0 0 10px;
    padding: 8px;
    text-align: center;
    text-shadow: 0 1px rgba(255, 255, 255, 0.75);
  background: #fff;
}

.news-letter-title:before {
  content: '';
  position: absolute;
  top: 0;
  left: 0;
  right: 0;
  height: 10px; /* top header bar height */
  background: #f06565;  /* top header bar color */
  border-radius: 5px 5px 0 0;

}

input {
  font-family: inherit;
  color: inherit;
  -webkit-box-sizing: border-box;
  -moz-box-sizing: border-box;
  box-sizing: border-box;
}

.news-letter-input {
  width: 100% !important;
  height: 40px;
  margin-bottom: 25px;
  padding: 0 15px 2px;
  font-size: 17px;
  background: white;
  border: 1px solid #d1d1d1;
  border-radius: 4px;
  -webkit-box-shadow: inset 0 -2px #ebebeb;
  box-shadow: inset 0 -2px #ebebeb;
}

.news-letter-input:focus {
  border-color: #c4c4c4;
  outline: none;
  -webkit-box-shadow: inset 0 -2px #c4c4c4;
  box-shadow: inset 0 -2px #c4c4c4;
}

.lt-ie9 .news-letter-input {
  line-height: 48px;
}

.news-letter-button {
  position: relative;
  vertical-align: top;
  width: 100%;
  height: 34px;
  padding: 0;
  font-size: 17px;
  color: white;
  text-align: center;
  text-shadow: 0 1px 2px rgba(0, 0, 0, 0.25);
  background: #f06565; /* button background  */
  border: 0;
  border-bottom: 2px solid #b65a51; /* newsletter button shadow */
  border-radius: 5px;
  cursor: pointer;
  -webkit-box-shadow: inset 0 -2px #b65a51;
  box-shadow: inset 0 -2px #b65a51;
}

.news-letter-button:active {
  top: 1px;
  outline: none;
  -webkit-box-shadow: none;
  box-shadow: none;
}

:-moz-placeholder {
  color: #ccc;
  font-weight: 300;
}

::-moz-placeholder {
  color: #ccc;
  opacity: 1;
  font-weight: 300;
}

::-webkit-input-placeholder {
  color: #ccc;
  font-weight: 300;
}

:-ms-input-placeholder {
  color: #ccc;
  font-weight: 300;
}

::-moz-focus-inner {
  border: 0;
  padding: 0;
}
Load the needed JS and CSS files
That includes planning which JS libraries we’ll need and also plan the dependencies order so we can assign the order of loading.
Functions we’ll use:
That is how styles and scripts are included in all WordPress plugins and widgets, you hook yourself to the ‘wp_enqueue_scripts’ action and load your files in the following way:
//functions.php or your plugin file
//...
add_action( 'wp_enqueue_scripts', function(){
    //VueJS
    wp_enqueue_script( 'VueJS', get_stylesheet_directory_uri().'/js/vue.js', false );

    //SweetAlert2
    wp_enqueue_script( 'Swal2', get_stylesheet_directory_uri().'/js/sweetalert2.common.min.js', false );
    wp_enqueue_style( 'Swal2-CSS', get_stylesheet_directory_uri().'/css/sweetalert2.min.css' );

    //Our code
    wp_enqueue_script( 'NewsletterWidget', get_stylesheet_directory_uri().'/js/newsletter-widget.js', ['VueJS', 'Swal2', 'jquery'], false, true );

    //2.Create the nonce and the ajaxurl objects - We will discuss this in detail in 'A word on nonces in AJAX'
    $params = array(
      'ajaxurl' => admin_url('admin-ajax.php', $protocol),
      'ajax_nonce' => wp_create_nonce('mailchimp_newsletter_widget'),
    );
    wp_localize_script( 'NewsletterWidget', 'ajax_object', $params );
} );
We’re using SweetAlert2 to display a modal telling the user, he/she successfully subscribed to our newsletter.
A word on nonces in AJAX
Nonces are a unique key, your site creates to verify actions. This is very useful in AJAX calls, as you want to be sure that calls originate from your website, and thus remote exploits and malicious use will result in “403 Forbidden error”. In order to pass the nonce to the Javascript file I use the function “wp_localize_script“. From the above script:
$params = array(
      'ajaxurl' => admin_url('admin-ajax.php', $protocol),
      'ajax_nonce' => wp_create_nonce('mailchimp_newsletter_widget'),
);
wp_localize_script( 'NewsletterWidget', 'ajax_object', $params );
From that point forward you have a global variable “ajax_object” and can access the parameters you’re passing like this:
ajax_object.ajaxurl
ajax_object.ajax_nonce
In order to verify your nonce in your AJAX controller you need the function: “check_ajax_referer”
Create the widget itself and do the VueJS markup and code
In this part we’ll need extended knowledge on how to develop WordPress widgets, thankfully that can easily be obtained by the Codex. I’ll work myself up the following widget skeleton, I’ve gathered from the Codex page I linked.
class My_Widget extends WP_Widget {

	/**
	 * Sets up the widgets name etc
	 */
	public function __construct() {
		$widget_ops = array(
			'classname' => 'my_widget',
			'description' => 'My Widget is awesome',
		);
		parent::__construct( 'my_widget', 'My Widget', $widget_ops );
	}

	/**
	 * Outputs the content of the widget
	 *
	 * @param array $args
	 * @param array $instance
	 */
	public function widget( $args, $instance ) {
		// outputs the content of the widget
	}

	/**
	 * Outputs the options form on admin
	 *
	 * @param array $instance The widget options
	 */
	public function form( $instance ) {
		// outputs the options form on admin
	}

	/**
	 * Processing widget options on save
	 *
	 * @param array $new_instance The new options
	 * @param array $old_instance The previous options
	 *
	 * @return array
	 */
	public function update( $new_instance, $old_instance ) {
		// processes widget options to be saved
	}
}
In the “public function widget( $args, $instance )” we’ll add the HTML markup of the widget we made earlier, in the “public function form( $instance )” we’ll add the settings of the widget, which in this case are MailChimp API Key and ListID, and in “public function update( $new_instance, $old_instance )” I’ll handle the saving of the settings. The final code will look something similar to:
<?php
class MailchimpWidget extends WP_Widget {
/**
* Sets up the widgets name etc
*/
public function __construct() {
$widget_ops = array(
'classname' => 'mailchimp_widget',
'description' => 'Mailchimp Widget woth Vue.JS',
);
parent::__construct( 'mailchimp_widget', 'Mailchimp Widget', $widget_ops );
}
/**
* Outputs the content of the widget
*
* @param array $args
* @param array $instance
*/
public function widget( $args, $instance ) {
wp_enqueue_style( 'mailchimp-newsletter', get_stylesheet_directory_uri().'/css/newsletter.css' );
// outputs the content of the widget
?>
<span id="newsletterWidget">
<form class="news-letter" action="#">
<h1 class="news-letter-title">Newsletter Signup</h1>
<input type="text" class="news-letter-input" name="" placeholder="What's your name?" autofocus>
<input type="text" class="news-letter-input" name="" placeholder="What's your Email?" autofocus>
<button class="news-letter-button">Subscribe Now</button>
</form>
</span>
<?php
}
/**
* Outputs the options form on admin
*
* @param array $instance The widget options
*/
public function form( $instance ) {
// outputs the options form on admin
$apiKey = !empty( $instance['apiKey'] ) ? $instance['apiKey'] : esc_html__( 'MailChimp api key', 'text_domain' );
$listId = !empty( $instance['listId'] ) ? $instance['listId'] : esc_html__( 'MailChimp list id', 'text_domain' );
?>
<p>
<label for="<?php echo esc_attr( $this->get_field_id( 'apiKey' ) ); ?>"><?php esc_attr_e( 'MailChimp api key:', 'text_domain' ); ?></label>
<input class="widefat" id="<?php echo esc_attr( $this->get_field_id( 'apiKey' ) ); ?>" name="<?php echo esc_attr( $this->get_field_name( 'apiKey' ) ); ?>" type="text" value="<?php echo esc_attr( $apiKey ); ?>">
</p>
<p>
<label for="<?php echo esc_attr( $this->get_field_id( 'listId' ) ); ?>"><?php esc_attr_e( 'MailChimp list id:', 'text_domain' ); ?></label>
<input class="widefat" id="<?php echo esc_attr( $this->get_field_id( 'listId' ) ); ?>" name="<?php echo esc_attr( $this->get_field_name( 'listId' ) ); ?>" type="text" value="<?php echo esc_attr( $listId ); ?>">
</p>
<?php
}
/**
* Processing widget options on save
*
* @param array $new_instance The new options
* @param array $old_instance The previous options
*
* @return array
*/
public function update( $new_instance, $old_instance ) {
$instance = array();
$instance['apiKey'] = ( !empty( $new_instance['apiKey'] ) ) ? strip_tags( $new_instance['apiKey'] ) : '';
$instance['listId'] = ( !empty( $new_instance['listId'] ) ) ? strip_tags( $new_instance['listId'] ) : '';
return $instance;
}
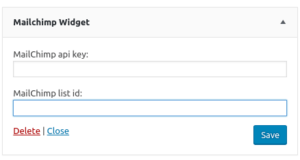
}Now if we register our widget in our functions.php or plugin file like this:
require_once("widgets/mailchimp-widget.php");
add_action('widgets_init', function() {
    register_widget('MailchimpWidget');
});
We should see it in the widget list looking similar to the following image, the settings save, however our widget does not do anything for now. In order to make our plugin actually do something we’ll need to get our hands dirty with some VueJS code and a little more PHP.
The widget VueJS markup is as follows:
/**
	 * Outputs the content of the widget
	 *
	 * @param array $args
	 * @param array $instance
	 */
	public function widget( $args, $instance ) {
		wp_enqueue_style( 'mailchimp-newsletter', get_stylesheet_directory_uri().'/css/newsletter.css' );
		// outputs the content of the widget
		?>
		<span id="newsletterWidget">
		    <span v-if="hidewidget">
		        <form class="news-letter" action="#">
	                <span v-if="subscribed">
	                    <img src="<?= get_stylesheet_directory_uri().'/images/subscribed.gif' ?>" />
                    </span>
	                <span v-else>
		                <h1 class="news-letter-title">Newsletter Signup</h1>
		                <input type="text" class="news-letter-input" name="" placeholder="What's your name?" autofocus v-model="name">
		                <input type="text" class="news-letter-input" name="" placeholder="What's your Email?" autofocus v-model="email">
		                <button class="news-letter-button" v-on:click="subscribe">Subscribe Now</button>
		            </span>
		        </form>
		    </span>
		</span>
		<?php
	}
And the JS is as follows:
jQuery(document).ready(function($) {
    var NewsletterWidget = new Vue({
        el: '#newsletterWidget',
        data: {
            name: null,
            email: null,
            subscribed: false,
            hidewidget: window.localStorage.getItem("codingStories_subscription")
        },
        methods: {
            subscribe: function () {
                var vueInstance = this;
                var data = {
		    'action': 'newsletter_widget',
		    'name': this.name,
		    'email': this.email,
		    'security': ajax_object.ajax_nonce
	         };
                jQuery.post(ajax_object.ajaxurl, data, function(response) {
                    var jsonResponse = JSON.parse(response);
		    if(jsonResponse.success)
		    {
		        vueInstance.subscribed = true;
		        window.localStorage.setItem("codingStories_subscription", true)
		        swal(
                            'Thanks!',
                            'You`ve successfully subscribed to our newsletter!',
                            'success'
                        );
		     }
		     else
		     {
		         if(jsonResponse.error)
		         {
		             swal(
                                'Oops...',
                                jsonResponse.error,
                                'error'
                             );
		         }
		         else
		         {
		             swal(
                                'Oops...',
                                'Something went wrong!',
                                'error'
                             );
		         }
		        }
	            });
	            return false;
            }
        }
    });
});
What this code effectively does is:
- If the user has subscribed the widget remains hidden
- If the widget just subscribed a “Subscribed check” appears in place of the widget
- Otherwise the form for the subscription is shown.
- When the user clicks subscribe, the subscribe method is called. When user subscribes the form is hidden and the “Subscribed check” is shown instead. window.localStorage saves an entry, telling our scripts on next load that the user already subscribed to the Newsletter.
Things are starting to look pretty decent, however the AJAX is still missing and thus the form doesn’t do anything yet.
Register the AJAX action that will process the request
Now, the most important part follows. To process the posted data, and to subscribe the user in the Newsletter. For this part we will once again have to read the WordPress documents and more precisely the part about AJAX in plugins.
//functions.php
add_action( 'wp_ajax_newsletter_widget', 'newsletter_widget_ajax' );
add_action( 'wp_ajax_nopriv_newsletter_widget', 'newsletter_widget_ajax' );
function newsletter_widget_ajax(){
    //Checks the Nonce
    check_ajax_referer( 'mailchimp_newsletter_widget', 'security' );

    //Obtaining clean POST parameters
    $name = filter_input(INPUT_POST, 'name');
    $email = filter_input(INPUT_POST, 'email');

    //Validation is simply checking for valid email and non empty name
    $validate = function() use($name, $email) {
        $errors = [];
        if (!filter_var($email, FILTER_VALIDATE_EMAIL))
        {
            $errors[] = 'Email address is invalid';
        }

        if(empty($name))
        {
            $errors[] = 'Name is required';
        }
        return implode(", ", $errors);
    };
    if(!empty($validate()))
    {
        echo json_encode(['success' => false, 'http' => false, 'error' => $validate()]);
    }
    else
    {
        //If validation passes try to subscribe
        $apiResponse = syncMailchimp(new class($name, $email) implements MailchimpData{
            private $name;
            private $names;
            private $email;
            private $type;
            public function __construct($name, $email)
            {
                $this->name = $name;
                $this->names = explode(" ", $name);
                $this->email = $email;
                // "subscribed","unsubscribed","cleaned","pending"
                $this->type = 'subscribed';
            }
            public function getFirstname()
            {
                return count($this->names) > 0 ? $this->names[0] : $this->name;
            }
            public function getLastname()
            {
                if(count($this->names) > 0)
                {
                    unset($this->names[0]);
                    return implode(" ", $this->names);
                }
            }
            public function getEmail()
            {
                return $this->email;
            }
            public function getType()
            {
                return $this->type;
            }
        });
        if($apiResponse == 200)
        {
            echo json_encode(['success' => true, 'http' => 200, 'error' => false]);
        }
        else
        {
            echo json_encode(['success' => false, 'http' => $apiResponse, 'error' => false]);
        }
    }
    die();
}
interface MailchimpData {
    public function getFirstname();
    public function getLastname();
    public function getEmail();
    public function getType();
}

function syncMailchimp(MailchimpData $data) {
    $widgetInstance = new MailchimpWidget();
    $widgetSettings = reset($widgetInstance->get_settings());

    $apiKey = $widgetSettings['apiKey'];
    $listId = $widgetSettings['listId'];

    $memberId = md5(strtolower($data->getEmail()));
    $dataCenter = substr($apiKey,strpos($apiKey,'-')+1); //eg. us13
    //http://developer.mailchimp.com/documentation/mailchimp/reference/lists/members/
    $url = 'https://' . $dataCenter . '.api.mailchimp.com/3.0/lists/' . $listId . '/members/' . $memberId;

    $json = json_encode([
        'email_address' => $data->getEmail(),
        'status'        => $data->getType(),
        'merge_fields'  => [
            'FNAME'     => $data->getFirstname(),
            'LNAME'     => $data->getLastname()
        ]
    ]);

    $ch = curl_init($url);

    curl_setopt($ch, CURLOPT_USERPWD, 'user:' . $apiKey);
    curl_setopt($ch, CURLOPT_HTTPHEADER, ['Content-Type: application/json']);
    curl_setopt($ch, CURLOPT_RETURNTRANSFER, true);
    curl_setopt($ch, CURLOPT_TIMEOUT, 10);
    curl_setopt($ch, CURLOPT_CUSTOMREQUEST, 'PUT');
    curl_setopt($ch, CURLOPT_SSL_VERIFYPEER, false);
    curl_setopt($ch, CURLOPT_POSTFIELDS, $json);

    $result = curl_exec($ch);
    $httpCode = curl_getinfo($ch, CURLINFO_HTTP_CODE);
    curl_close($ch);

    return $httpCode;
}
I’m passing the data for “syncMailchimp” as an anonymous class because I want to implement the “MailchimpData” interface and make the code a little more future proof. If we do some changes in the future the interface will make sure we deliver the needed functions. But why not define a class but use the anonymous one you ask. Well because I only use it once in the whole code, and that is the bookcase usage for anonymous classes.
Although the whole process seems like a lot of work, VueJS actually saved me hours of coding!
You can download the code for this how-to in
and it is currently undergoing review process to publish it in the WordPress repository.
Update: The plugin is now published in the WordPress repository and you can download it here.
Leave a Reply